Baseball Pitching Platforms - Pitching Mound Construction:
Baseball Pitching Platforms
The construction of a Pitching Mound is no small task in which anyone can jump right into and build in a couple of hours. Time, patience and precision must be paramount in the mound’s construction or risk the possibility of injuring players or totally disrupting their pitching mechanics.
Therefore, before undertaking this task it is important the designer and builders realize the importance of a mound. A mound built too high gives the pitcher an unfair advantage over the hitter, while at the same time, one too low, favors hitters.
Don’t be frightened by the perceived technicalities of building a quality pitching mound, as any dedicated worker, taking their time to measure and re-measure as the building process proceeds, will finish with a quality product. We’re going to walk you through it, step by step.
It’s said “Failing to Plan ..is Planning to Fail,” and failing is not an option when building an infield for our players. Therefore, we must begin at square one, which is properly locating the exact positioning of the pitching mound, and in order to accomplish this, we must lay out our infield first.
Let me prerequisite a few items.
1.We will set all dimensions for 90’ bases, as it is relatively easy to set up smaller base paths for younger aged players based on the standard legal baseball infield.
2. It is assumed You already have Home Plate set and most likely a current infield. If this is not the case, You’re Not Ready To Begin Construction of a Pitching Mound.
Baseball Pitching Platforms
The Beginning: Step One: Baseball Pitching Platforms
Everything begins with the Apex of Home Plate (the back corner) from which nearly all dimensions either begin or end.
From the Apex, measure 127’feet and 3-3/8” inches and drive a wood or metal stake firmly into the ground at this point, as this will be the Center of Second Base.
With the tape measurer in place marking the center of second base, locate front of the pitching rubber, which is 60’ 6” from the Apex of Home Plate.
It’s best to use two tape measurers when locating First and Third Bases. From the stake at Second Base, measure 90’ to First Base, and the second tape measurer from the Home Plate Apex to First Base. At 90’ where the tapes cross one another, that is the Back Corner of First Base.
Repeat these exact steps in order to locate Third Base. Remember, a baseball infield is actually a 90 foot square, with First & Third Base fitting inside the square, but Second Base is from the center of the bag.
Should you finish laying the bases out, and stepping back to review the bases appear slanted or out of line, recheck everything.
It is quite possible it is an optical illusion. Trust your tools and your measurements. If they read correctly, it’s correct.

Baseball Pitching Platforms
Step Two: Locating The Pitching Mound
This is where patience and precision must be utilized:
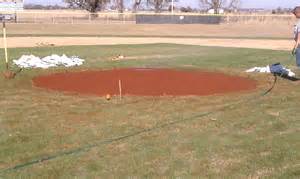
The Pitching Rubber measures 24” long & 6” wide. Position the rubber, centering it on the mark you have already located at 60’ 6” when you originally laid out the infield. From this mark, measure 10 feet forward towards home plate, and 8 feet backwards towards second base. Now, using a stake at the center of the Pitching Rubber and a 9’ piece of string, mark the outside dimensions of the Pitching Mound, which will give you an 18’ diameter circle.
The top of the mound consists of a 5 foot wide plateau (level area).
Step Three: Marking The Proper Height:
A Regulation Pitching Mound is 10 ½ inches higher than Home Plate. There are several methods to find and mark the height, with the use of a transit being the most accurate.
However, if you don’t have access to a transit or anyone who knows how to use one, there’s always the old reliable string and ruler. Drive a stake at the Apex of Home Plate and another at the center of the Pitching Rubber. Tying a string to the Apex stake, at ground level, pull the string taunt around the stake at the pitching rubber. Measure 10 ½ inches from the ground up the stake and mark it.
Baseball Pitching Platforms
Be sure the stakes are driven solidly into the ground to stop movement and insure the string is touching the ground at home plate.
TIP: It may be a good idea to use a ¾” to 1” piece of steel re-bar for your height marker as this will be your benchmark the entire building process. With the intention of leaving the re-bar in place permanently ( easy location by a metal detector should the benchmark need to be located in the future) drive the re-bar into the ground at 10” remembering you’ll need to add another ½” of dirt to achieve your proper height. This procedure is not required, only offered as an option.
Step Four: Final Measurements:
You’re nearly finished with your measuring, with only the slope remaining to be laid out. The slope towards home plate will be your major concern and focus. As you build the pitching mound’s height, getting the front slope correct will automatically form the correct slope for the rest of the mound.
The slope of the mound is 1” for every 1’ until it reaches ground level. This sounds complicated, but with a transit it’s a snap, but since we don’t have a transit we’ll just do it the old fashioned way.
1. The slope meets the ground 10’ in front of the pitching rubber, which means you’ll need to cut 9 wooden markers at 1” increments. In other words cut 1-9” piece, 1-8” piece, 1-7” piece and so on.
2. The mound is built in 1” intervals. So we’ll install our 1” marker and build the mound to that level, remove the marker, then install the 2” marker and build to that level and so on.
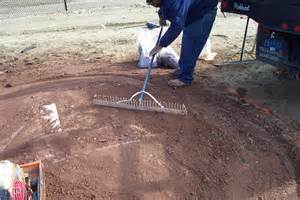
Step Five: Constructing The Pitching Mound With The Proper Materials:
It is very important to use the proper mixture of dirt, sand and clay to construct the mound. Unlike the infield, the pitching mound experiences a significant amount of foot traffic, which will break down and degrade a dirt only mound.
Baseball Pitching Platforms
Just the issue of pitchers digging out their own landing spot or their plant foot against the rubber will quickly destroy the integrity of a dirt only mound.
The Best standard pitching mound soil is comprised of 40% Sand, 20% Silt and 40% Clay. The silt and clay provide the firmness the mound will require in which to maintain its integrity with minimum amount of field maintenance. This mixture is also excellent for usage for the batter, catcher, umpire area of home plate.
Building Process: Baseball Pitching Platforms
Build the mound 1” at a time, covering the entire 18’ diameter with the mixture. Firmly pack each layer down, renting a powered soil packer is well worth the money, both in time and job quality, before proceeding to the next 1” layer.
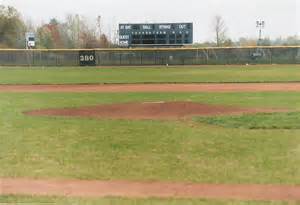
By following these instructions and using patience and quality materials, your finished product will rival any high school or college Pitching Mound.
Baseball Pitching Platforms to Baseball Training Equipment

New! Comments
Have your say about what you just read! Leave me a comment in the box below.