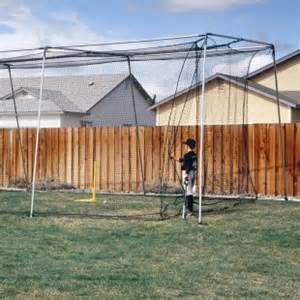
Portable Indoor Batting Screens
Indoor Batting Cages & Screens are available in just about any size and quality you can imagine. There are numerous quality Manufacturers which build an excellent product ranging from “Do it Yourself Construction” to Professional installation. However, the costs for such products are not cheap.
I realize there are Coaches who are very fortunate and have built a relationship with a sponsor(s) who considers price as no object, but the remaining 98% of us are not so fortunate. We are thrilled if we can just get the sponsor to cover the cost of new uniforms.
Coming from the ranks of the so called “Poor” I was forced to be creative if I wanted to compete with the Big Boys and that included maximizing the quality of my indoor practices.
I read these other Baseball web sites and they give suggestions for hitting drills inside a gym or cafeteria and wonder “How do they hit in an enclosed area?” I was always restricted from any hitting drills due the chance of damaging something, a broken window or a loud speaker knocked off the wall.
Being restricted by money or lack of it and forbidden from taking uncontrolled batting practice I had to improvise in order to allow my players to get in some swings.
Constructing a Portable Indoor Batting Screen
The first matter you must decide upon is, “Do You Want it to be Portable as far as Put Up and Take Down,” or do you want it “Permanently Put Together and Transportable?”
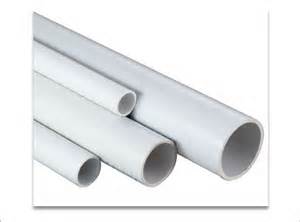
The Indoor Batting net I built was constructed out of 1 ½ ” PVC pipe. The weight was easy to handle, but you can increase to 2” PVC pipe, I discourage 3” pipe as it becomes heavy quickly.
I suggest initially building the Screen to be disassembled & reassembled as the construction for a permanent one is identical with the exception of a few PVC couplings, which you can glue together to make the Screen permanently assembled.
Items Required to Build the Indoor Batting Screen:
5 - 10’ long - 1 ½” PVC Piping ( Pipe comes in 10’ lengths )
4 - 90 Degree 1 ½” PVC Fittings
2 - 1 ½” PVC Coupler Fittings
4 - 1 ½” PVC Tee Fittings
5 - Small PVC Solvent & Glue Combo
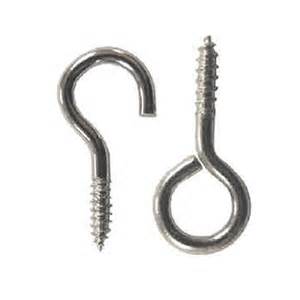
7 - 3/8” or 1 /2” Eye Lets - Either Screw In or Bolt & Nut
Fish Netting
Instructions
1. Cut 2 - 8’ pieces of PVC pipe for Sides.
2. Cut 2 - 3’ 11” PVC pipe for Top.
3. Cut 2 - 2’ 11” PVC pipe pieces & 1 - 3’ section for the Bottom
4. To assemble the Two Sides: Using a Flat Surface ( be careful where you assemble the PVC pieces because the Solvent will stain, even concrete ) to insure the 90 degree angle fittings are completely straight, apply solvent around the outside end of the pipe and the inside of the 90 degree fitting. Allow a few seconds for the solvent to work, then apply glue over the places which were painted with solvent, and push the fitting onto the pipe, holding it firmly for a few seconds for the glue to set up. Perform the same procedure to the other end of the pipe. Then repeat on the second side piece.
** Do not use excessive amounts of solvent or glue as it is not required. Use a rag to wipe the excess glue & solvent from the joints for a better looking job. **
5. Join 1 end of a 3’ 11” top PVC piece, solvent and glued, into the 90 degree fitting of a side piece. Repeat the same procedure for the next side piece.
Join a Coupler Fitting to one end of the top rail, solvent & glue. Once dried, insert the end of the other top piece into the coupler fitting without gluing. This is where the top part of the Indoor Batting net will come apart for dis-assembly. If you’re building a stationary net, either glue both sides of the coupler …or cut a 8’ piece of PVC pipe and glue into the side rails 90 degree angle.
You now have 2 side pieces assembled and the top rail, either able to come apart or stationary.
6. The Bottom Rail will be the <I>Most</I> difficult to assemble. Again assemble on a flat surface to insure correct alignment. Glue 1 - 2 ½’ PVC piece into a Tee Fitting facing one direction, glue another Tee Fitting adjacent to the first, facing the opposite direction.
Repeat this for the opposite side of the bottom rail.
7. Now either glue the 3’ section of PVC pipe into the Tee Fittings, for a stationary build, or install a coupler in the same method as used on the top bar.
8. Secure, solvent & glued, the 4 - 4’ PVC pieces into the 4 Tee Joints facing opposite directions.
You now have an 8’ x 8’ Indoor Batting Net assembled and held stationary by the 4 - 4’ PVC legs facing in opposite directions.
9. Install the Hooks or Eye lets. Drape the Netting over the top rail to the back floor legs and attach to side hooks. Leave the net loose in order to absorb the energy of the ball making it fall to the floor at the base of the net.
You have constructed a home made Indoor Batting Net, stationary, which at the 8 x 8 size will transport in the bed of a pickup, or one which disassembles.
You’ll probably want to tweak the way the net is draped to fit your requirements.
**Look on EBay for used fish netting and the total cost should run between $50 - $65.**
Constructing a Batters Box
Using a batters box in conjunction with the net gives the players more of a sense of reality and are easy and inexpensive to make.
1. Purchase a 7’ or 8’ wide (depending on how the carpet comes) by 12’ long piece of indoor/outdoor Astroturf floor covering.
2. Measure and tape off where Home Plate is to be Located and a line 3” off the plate on either side. This will constitute your strike zone and be an indicator of where the batter should stand.
3. Using White spray paint, the $1 a can is just as good for this as the $8 a can paint, spray the lines and the area of home plate.
4. It’s best to paint the details in light layers, perhaps 3 to 5 times, allowing 15 - 20 minutes to dry in between painting. This of course depends on temperature, humidity & etc. Use your best judgment.
You now have a batters box where you can place the Tee and hit into the net. You can also Soft Toss to the hitter using this equipment.
Indoor Batting to Teaching Hitting

New! Comments
Have your say about what you just read! Leave me a comment in the box below.